- Hoover Support Library
- Troubleshooting
- SmartWash Carpet Cleaner
-
Troubleshooting
- Batteries & Chargers
- CleanSlate
- CleanSlate XL
- Commercial Shoulder Vac Pro Backpack Vacuum
- Complete Performance Advanced
- Corded StreamLine
- Dual Spin Max Pet/ Dual Power Pet
- Floormate Deluxe
- Floormate Jet
- FloorMate SpinScrub Hard Floor Cleaner
- Hoover Excelerate Cordless Stick
- LinX
- ONEPWR Blade
- ONEPWR CleanSlate
- ONEPWR Emerge
- ONEPWR Emerge Pet All-Terrain
- ONEPWR Evolve Pet
- ONEPWR Evolve Pet Elite
- ONEPWR React/ Fusion
- ONEPWR SmartWash
- ONEPWR Streamline
- PowerDash GO
- PowerDash Pet Advanced
- PowerDash Pet Compact
- PowerDash Pet Hardfloor
- PowerDash Pet+
- PowerDrive Swivel XL/ Elite Swivel/ High Performance Swivel
- PowerScrub Deluxe
- PowerScrub Elite
- PowerScrub XL
- Pro Pet Swivel/ PowerDrive Pet
- SmartWash Carpet Cleaner
- SmartWash Essentials
- SmartWash Pet Carpet Cleaner
- Spotless Portable Cleaner
- Steam Complete Pet
- Steam Mop
- Total Home Pet MAXLIFE
- WindTunnel 3 High Performance
- WindTunnel Air Steerable Pet
- WindTunnel Tangle Guard
- Windtunnel Tangle Guard All-Terrain
- Whole House Rewind
-
Product Information & Guides
SmartWash - Brush roll not spinning
This article contains information on how to fix Brush roll issues on the Smartwash
IMPORTANT: Always disconnect the unit from the power source before removing any parts.
If your Smartwash Brush roll is not working, follow the following steps:
TIP: Make sure the unit is reclined; the brush roll won't spin in the upright position.
-
To access the brush roll, remove the nozzle from the unit by pulling up on the latch and pulling forward
-
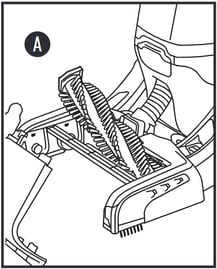
Grab the Brush roll side with the notch (A) and pull up to remove. Repeat this process on the second brush roll.
- Remove any tangled debris and clear the brushes under running water.
- To replace the brushes in the unit, align side (B) of the brush roll to the drive gear. Then press tab (A) down until it snaps in place.
- Once done replace the nozzle by lining up the two tabs on the base of the nozzle with those on the unit and rock the nozzle back into place.
NOTE: If you have tried to troubleshoot and need to fill a warranty claim, please visit our Warranty Information page for more information on how to do so.