Floormate Deluxe - Leaking
This article contains information on how to fix leaking issues on the Floormate Deluxe.
CAUTION: We highly advise to use the correct cleaning solution for this unit, any other cleaning solution could cause excess foaming and a motor bypass. You will notice this because the unit will leak from the exhaust port.
If your Floormate Deluxe is leaking, follow the following steps:

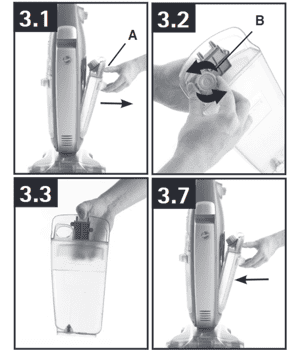
- Remove your clean water tank (A) from the unit.
- Open the tank and make sure it's filled to the correct quantity.
- Once the tank is filled, seal the lid (B) properly and firmly.
- Align the bottom of the tank with the unit and then rock it back into place.

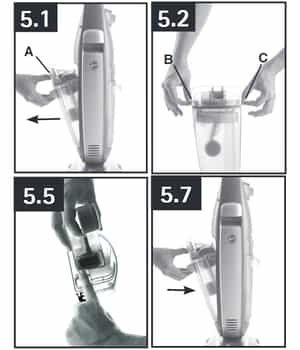
- Pull the dirty water tank (A) by rocking it out of the unit.
- Lift the tank's lid by pulling on the side notches (B & C).
- Ensure your filter is free of dirt and debris. Rinse under water until clean.
- To place the tank back into the unit, align the bottom of the tank with the unit and then rock it back into place.
TIP: Once you're done cleaning, keep the unit ON for some time to allow all the water to make its way to the dirty water tank, this will reduce leaking once the machine is OFF.
Control valve issue.
NOTE: Some leaking issues could be caused by a flash in the control valve O-Ring. Quality engineers were able to correct the issue by repeatedly pressing the "Clean Boost" (C & B) triggers 8-10 times (See below) and the leaking stopped.

How to manually cycle the internal valve if the previous step did not fix the issue.

- Unplug your unit from the power source.
- Remove the handle screw and pull out the handle.

- Please locate the trigger actuator within the unit.
- Insert a screwdriver into the actuator until the screwdriver stops. Your screwdriver will be sitting on the internal actuator lever.

- Press firmly down on the screwdriver to manually cycle the internal valve. Cycle the valve 3-5 times.
- Reassemble the handle and test the unit. Repeat the process if the unit continues to leak and apply enough pressure to ensure proper cycling of the internal valve.
- If the process does not fix the leak, please contact our customer service team.
WARNING: Please refrain from accessing the O-ring. The O-ring is located inside the assembly and accessing this may result in the complete failure of the unit.
NOTE: If you have tried to troubleshoot and need to fill a warranty claim, please visit our Warranty Information page for more information on how to do so.
