
Follow these steps if the unit has low/ no suction and you're DRY Vacuuming
NOTE: Once the dirty water tank gets filled, the automatic shut-off is engaged and suction is lost.
-
Make sure your tank is empty.
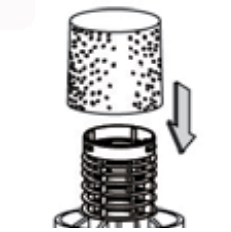
- If you're DRY Vacuuming ONLY, check that your cartridge filter is properly mounted. Remove your power head and turn it upside down, then push the filter until it stops against the power head and install the retainer.
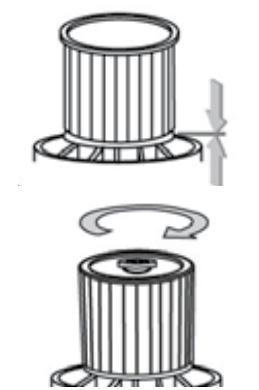
- Once the filter is installed, flip the powerhead and place it over the recovery tank, and lock it in place using the latches on the side.

CAUTION: Do not use the dust filter for vacuuming liquids, it will lead to the motor burning and a void warranty.
Follow these steps if the unit has low/ no suction and you're WET Vacuuming
-
Make sure your tank is empty.
- If you're WET Vacuuming ONLY, remove your cartridge filter from the previous section, then carefully install the foam sleeve.
- Once the foam filter is installed, flip the powerhead and place it over the recovery tank, and lock it in place using the latches on the side.
- After use, empty the container by unscrewing the drain cap and draining the liquids. Remember to refit the drain cap to the container after draining the container

NOTE: The foam filter must be removed after wet vacuuming and a reusable cartridge
filter must be installed before dry vacuuming again